|
The recommended workflow for Nexus 2 is to use a ROM trial and dynamic calibration as this offers the benefits of the new, more efficient labeler and automated labeling (for more information on the new workflow, see New workflow for Vicon Nexus 2).
However, if you need to reproduce exactly the same results that you obtained from versions of Nexus prior to 2.0, you can do this, using the same workflow and the same labeling skeleton template as before.
To use the earlier subject calibration workflow:
1. Capture a static trial.
2. Reconstruct the trial using your usual preferred method (Reconstruct button or Pipeline tools).
3. Attach the appropriate old labeling skeleton template (VST file) to the subject, for example, PlugInGait FullBody.vst.
Important: To use the old workflow, ensure you use the required old labeling skeleton template, (PlugInGait.vst, PlugInGait Fullbody.vst, etc). If you chose to import old settings files when you first installed Nexus 2.x, you can select it from the list of available templates. If you didn’t import the old settings files when you installed Nexus 2, copy the old VST files from ...\Vicon\Nexus\ModelTemplates to ...\Vicon\Nexus2.x\ModelTemplates.
4. Manually label the subject in the usual way, using the Label/Edit tools pane.
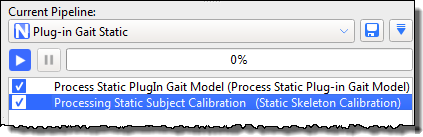
5. In the Pipeline tools pane:
a. Select the PlugInGait Static pipeline.
b. Enable the Processing Static Subject Calibration operation.
c. Run the pipeline.
6. Collect the required dynamic trials.
7. Run the Reconstruct And Label pipeline.
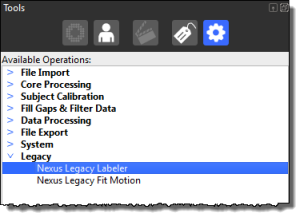
Note also that if you used labeling in Nexus 1.x and want to reprocess old data to get the same results as you did in Nexus 1.x, you can do this by using a pipeline operation called Nexus Legacy Labeler, which is available in the Legacy pipeline operations section.