 |
♦ Location: Resources pane > System tab > Local Vicon System > Properties pane > Genlock and Timecode section
The Properties pane (Advanced Properties) for Local Vicon System includes additional controls and changed options.
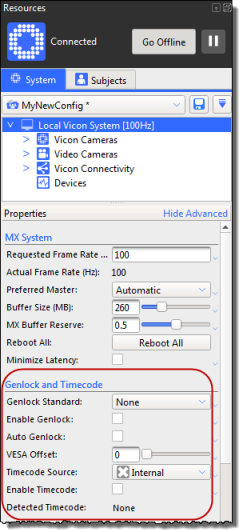
Tip: Genlock and Timecode settings that were formerly properties of Vicon Connectivity devices are now available as properties of Local Vicon System.
To choose the type of video standard supported by the connected video source, in the Local Vicon System properties, select an option from the Genlock Standard list, now available in the Genlock and Timecode section. Supported standards now include 30Hz and VESA options.
Important: Before using the 30Hz option, ensure that the MX firmware is upgraded to Bundle 500 or above.
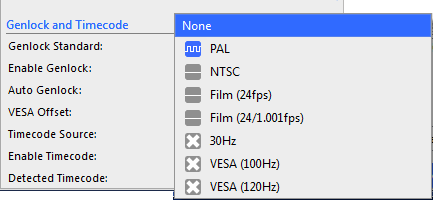
The icon to the left of each option provides additional information about the availability of that standard:
|
Icon |
Meaning |
|
|
The standard is not supported by the hardware (that is, no connected device supports locking to a signal of that type). If you select an unsupported standard, it restricts the available frame rates as it does in the previous version of Nexus. |
|
|
No device in the system is detecting that standard. |
|
|
The master device is detecting that signal and can genlock to it. |
|
|
If you select a mode with the blue wave icon and then select the Enable Genlock check box, the icon turns green. |
|
|
A device in the system is detecting the mode but a problem prevents it from being used, for example, if the signal is being detected by a device that is not the master device in the system. |
In all cases, you can display a tooltip by holding the mouse over the Genlock Standard list.
When Auto Genlock is selected in the Genlock and Timecode section of Local Vicon System properties, Nexus automatically selects a genlock standard and enables genlock based on the signals that are currently detected.
The Use Dropframe check box, which determined whether the internal timecode source generated a drop-frame timecode when the genlock standard is NTSC, is replaced by an Internal Drop option in the Timecode Source list of the Genlock and Timecode section.
Tip: VITC and LTC always display a flat line if the system is not genlocked. This is because these signal types can only be detected by a master device that is genlocked.
VESA Offset only applies when you have selected one of the VESA standards from the Genlock Standard list in the Genlock and Timecode section. It enables a system offset relative to VESA signal (as a fraction of the VESA frame period). It changes when the Vicon cameras take a frame (and hence when the camera strobes are on) relative to the incoming VESA frames. The camera timing can be offset by up to one VESA frame. The main purpose of this feature is to prevent camera strobes from interfering with the IR synchronized 3D glasses used in some virtual reality systems.
Detected Timecode is now given as the number of timecode frames per second for example, 24 fps, 25 fps, 30 fps, 30 fps DropFrame, instead of PAL, NTSC etc.

 Cross
Cross Flat line
 Blue square wave
 Green square wave
 Red square wave