♦ Location: Tools pane > Pipeline tab > Auto Intelligent Gap Fill pipeline
or
♦ Location: Nexus tool bar > Auto Gap Fill button
To enable you to quickly fill all gaps in your trial, without having to choose which fill method is best for each gap, you can now let Nexus do the work for you. You can do this in an easy, one-click operation or, if you want to modify the supplied operations, by changing and running the Auto Intelligent Gap Fill pipeline.
To use the Auto Intelligent Gap Fill pipeline:
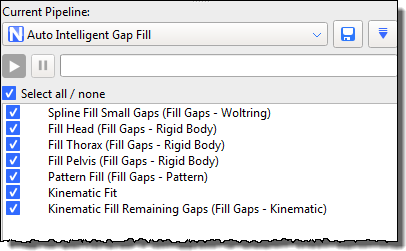
1. On the Tools pane, click the Pipelines button.
2. From the Current Pipeline list, select the Auto Intelligent Gap Fill pipeline.
3. From the list of operations below, select the gap-filling operations that you want to use. If required, in the Properties pane, modify the relevant settings.
4. Either click the Run button or use the Auto Gap Fill button on the tool bar, as described below, to run the pipeline with any changes you have made.
To use automatic gap-filling:
1. Ensure your trial has been fully reconstructed and labeled.
2. In the Nexus tool bar, click Auto Gap Fill.

Nexus assesses each gap one-by-one in series and fills all the gaps.