
 |
Bad camera contributions
In some situations, a camera tracks a point that gives bad contributions, for example, when a point is on the edge of the face, is too small, or disappears. In other cases, points get too close together and the size of the blob jumps, which can add noise to the data.
The following example from the supplied ROM take shows the rCheek marker in Channel 1 on the edge of the face.
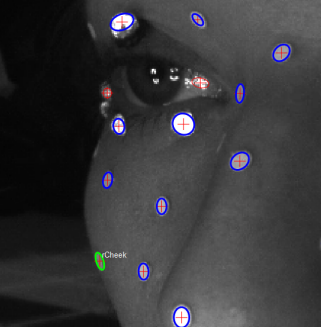
Points on the edge of the face can cause bad or noisy data, which is visible in the 3D Graph View and in the Selected Point view, as shown in the following example.
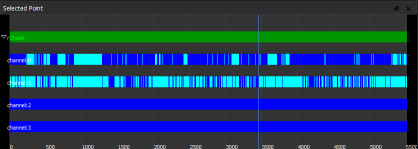
The light blue data represents where a blob has disappeared and the tracker has dropped to patch tracking. For more information on patch tracking, see Target tracking in the Vicon CaraPost Reference.
You can fix these issues in different ways, depending on how much of the take is affected, as described in the following steps.
To fix camera contributions that are bad across the whole take:
1. To remove the camera from contributing across the whole take, select the marker in the required camera view. In the above example from the supplied ROM take, select the rCheek marker in Channel 1.
Tip: You are recommended only to remove camera contributions on points that are seen in three or more camera views.
2. On the Edit menu, click Detach Detections [Active Range].
The camera contributions are removed and the point is updated in the 3D view.
If the bad contribution is only across you a certain range, you can select the range of the swap and delete the detections, as described in the following steps.
To fix camera contributions that are bad across a limited range:
1. Go to the first frame of the swap and on the View menu click Set Active Range Start (or press CTRL+1), then go to the last frame or the frame where it swaps back and on the View menu, click Set Active Range End (or press CTRL+2).
2. To remove the contributions across the range, select the point in the camera view and on the Edit menu, click Detach Detections [Active Range] (or press CTRL+SHIFT+H).