 |
The following steps show how to calculate SCoRe joint centers and SARA knee axes in the same workflow. Including both hips and knees in the same workflow saves time, but relies on having a subject who can perform the required ROMs reasonably easily and without much assistance.
Before you begin, make sure you have set up monitors to display all the required range of motion for both hips and knees. (For information on setting up joint range monitors, see View real-time subject calibration feedback with monitors.)
To calculate SCoRE joint centers and SARA knee axes:
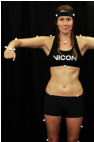
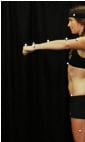
1. Capture a subject ROM. Ensure that, for the first few frames and last few frames, the subject is in the motorbike pose, as shown in the following images.
2. Reconstruct the trial and then run the Auto Initialize Labeling pipeline on the first frame of data (motorbike pose) to initialize the labeling.
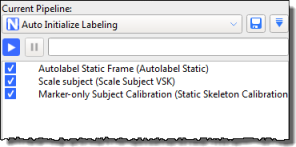
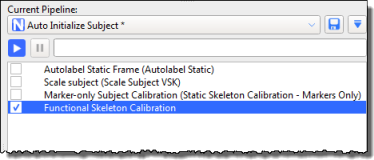
3. Run the Functional Skeleton Calibration pipeline operation (found in the Subject Calibration pipeline operations) to calibrate the labeling skeleton.
4. Capture ROM trials that move the hip joint and knee joints through a ROM, as described in Capture and process a trial with SCoRE and SARA.
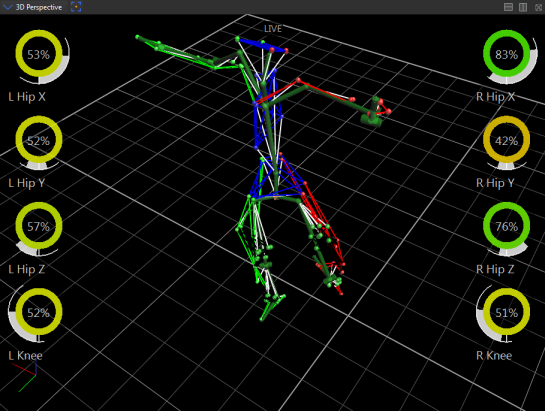
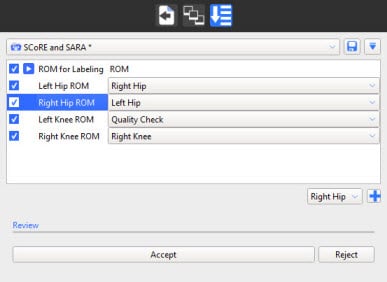
To enable you to quickly assess the ROMs for multiple SCoRE and SARA trials, you can set up a biomechanics workflow, including joint range monitors, similar to the following:
For information on setting up a biomechanics workflow, see Create a biomechanics workflow.
5. Run the Reconstruct and Label pipeline.
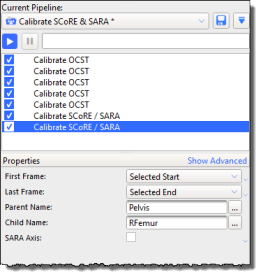
6. Create a new pipeline to contain the SCoRE/SARA calibrations you will need, plus any required OCST calibrations. For example, you could call the pipeline Calibrate SCoRE & SARA.
7. Add the required Calibrate OCST pipeline operations to the new pipeline (see Prepare data for use with SCoRE and SARA).
8. Specify OCST segments for all the required joints, for example:
– Pelvis (LASI, RASI, LPSI, RPSI)
– LFemur (LASI, LTHI, LKNE)
– LTibia (LKNE, LTIB, LANK)
– RFemur (RASI, RTHI, RKNE)
– RTibia (RKNE, RTIB, RANK)
Your new pipeline will now look similar to this:

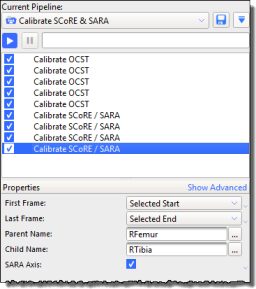
9. For each joint, add a Calibrate SCoRE/SARA operation (found in the Subject Calibration pipeline operations), and specify each parent and child segment, for example:
– For left hip:
Parent Name: Pelvis;
Child Name: LFemur
– For right hip:
Parent Name: Pelvis
Child Name: RFemur
For these two joints, leave the SARA Axis check box cleared, as it is normally more applicable to the knee joints.
Then add two more Calibrate SCoRE/SARA operations for the knee joints:
– For the left knee:
Parent Name: LFemur
Child Name: LTibia
– For the right knee:
Parent Name: RFemur
Child Name: RTibia
For these two joints, select the SARA Axis check box, as it is applicable to the knee joints.
10. Save the pipeline and calibrate the joints by running the Calibrate OCST and Calibrate SCoRE/SARA pipeline operations.
New hip and knee joint markers are displayed in the 3D Perspective view pane.
11. Collect dynamic trials with the subject performing the required movement (walking, etc).
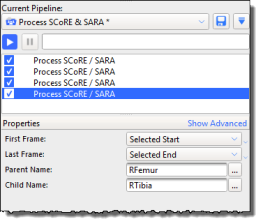
12. Create a new Process SCoRE & SARA pipeline to contain the processing operations.
13. For each SCoRE/SARA joint that you created previously, add a Process SCoRE/SARA operation (found in the Data Processing pipeline operations). Specify the same Parent and Child segments as those you created in the Calibrate SCoRE & SARA pipeline.
14. Run the processing pipeline.
